Blog

Disable Windows Vista/7/8/8.1 Thumbnail Caches (Privacy, Performance, Paranoia, and Anti-Forensics)

By default, every version of Windows since XP creates thumbnail database files that store small versions of every picture in every folder you browse into with Windows Explorer. These files are used to speed up thumbnail views in folders, but they have some serious disadvantages:

  1. They are created automatically without ever asking you if you want to use them.
  2. Deleting an image file doesn’t necessary delete it from the thumbnail database. The only way to delete the thumbnail is to delete the database (and hope you deleted the correct one…and that it’s not stored in more than one database!)
  3. These files consume a relatively small amount of disk space.
  4. The XP-style (which is also Vista/7/8 style when browsing network shares) “Thumbs.db” and the Windows Media Center “ehthumbs_vista.db” files are marked as hidden, but if you make an archive (such as a ZIP file) or otherwise copy the folder into a container that doesn’t support hidden attributes, not only does the database increase the size of the container required, it also gets un-hidden!
  5. If you write software, it can interfere with software version control systems. They may also update the timestamp on the folder they’re in, causing some programs to think your data in the folder has changed when it really hasn’t.
  6. If you value your privacy (particularly if you handle any sort of sensitive information) these files leave information behind that can be used to compromise that privacy, especially when in the hands of anyone with even just a casual understanding of forensic analysis, be it the private investigator hired by your spouse or the authorities (police, FBI, NSA, CIA, take your pick).

To shut them off completely, you’ll need to change a few registry values that aren’t available through normal control panels (and unavailable in ANY control panels on any Windows version below a Pro, Enterprise, or Ultimate version). Fortunately, someone has already created the necessary .reg files to turn the local thumbnail caches on or off in one shot. The registry file data was posted by Brink to SevenForums. The files at that page will disable or enable this feature locally. These will also shut off (or turn on) Windows Vista and higher creating “Thumbs.db” files on all of your network drives and shares.

If you want to delete all of the “Thumbs.db” style files on a machine that has more than a couple of them, open a command prompt (Windows key + R, then type “cmd” and hit enter) and type the following commands (yes, the colon after the “a” is supposed to be followed by an empty space):

cd \

del /s /a: Thumbs.db

del /s /a: ehthumbs_vista.db

This will enter every directory on the system hard drive and delete all of the Thumbs.db files. You may see some errors while this runs, but such behavior is normal. If you have more drives that need to be cleaned, you can type the drive letter followed by a colon (such as “E:” if you have a drive with that letter assigned to it, for example) and hit enter, then repeat the above two commands to clean them.

The centralized thumbnail databases for Vista and up are harder to find. You can open the folder quickly by going to Start, copy-pasting this into the search box with CTRL+V, and hitting enter:

%LOCALAPPDATA%\Microsoft\Windows\Explorer

Close all other Explorer windows that you have open to unlock as many of the files as possible. Delete everything that you see with the word “thumb” at the beginning. Some files may not be deletable; if you really want to get rid of them, you can start a command prompt, start Task Manager, use it to kill all “explorer.exe” processes, then delete the files manually using the command prompt:

cd %LOCALAPPDATA%\Microsoft\Windows\Explorer

del thumb*

rd /s thumbcachetodelete

When you’re done, either type “explorer” in the command prompt, or in Task Manager go to File > New Task (Run)… and type “explorer”. This will restart your Explorer shell so you can continue using Windows normally.
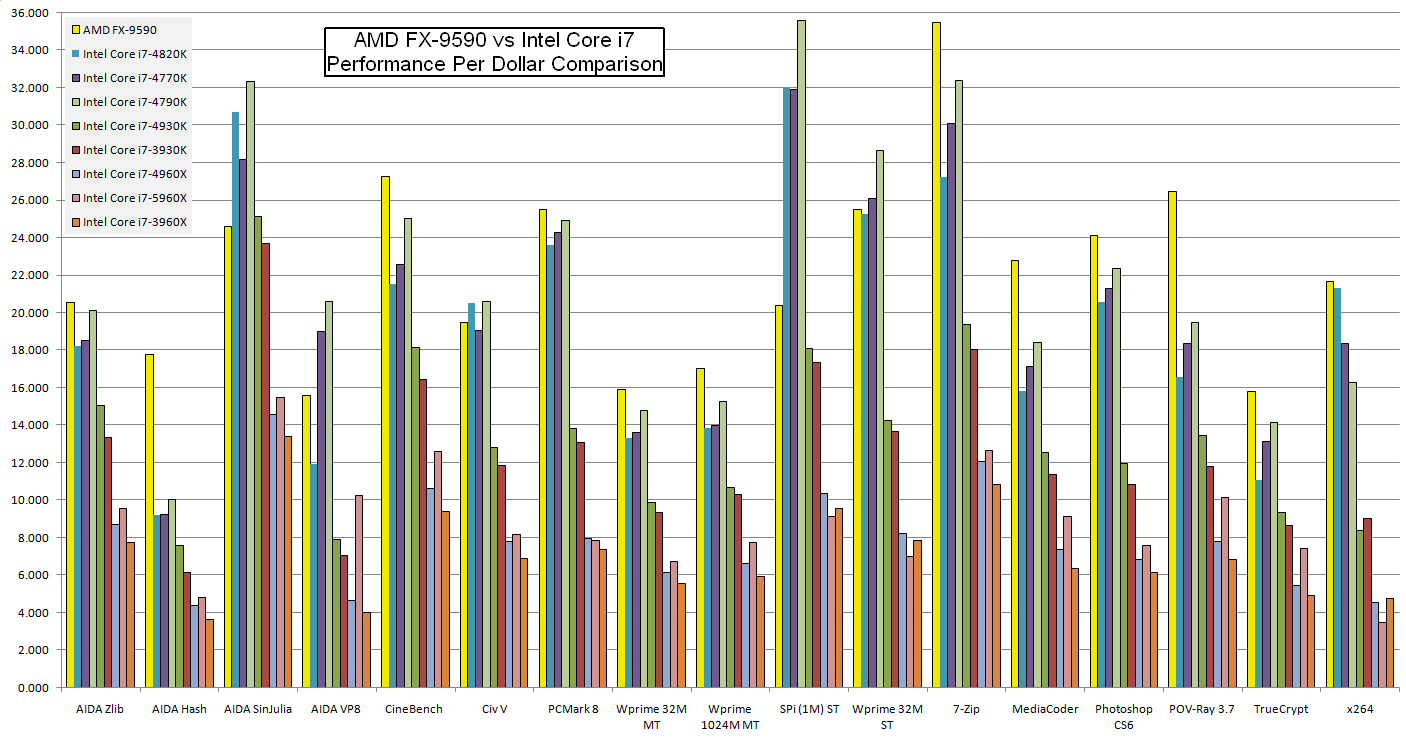
AMD FX-9590 Beats Intel Core i7 (4770K, 4790K, 5960X, etc.) in Price vs. Performance Comparisons

I decided this month that it was time to look at replacing my AMD Phenom II X4 965 BE chip with something that could transcode high-definition video faster. Sure enough, I chose the AMD FX-9590 CPU. Arguments against the AMD FX-9590 on forums such as Tom’s Hardware and AnandTech include “power efficiency is too low/TDP is too high” and “Intel has higher/better instructions per clock (IPC)” and “Intel’s i7 performs so much better.” Notably, the price to obtain the superior Intel performance was almost completely ignored in these discussions. Consider that the AMD FX-9590 retails for around $260 and the Intel Core i7-4770K it is often compared to costs $335; that $75 difference is enough cash to buy a cheap motherboard or a 120GB SSD, and also represents a 29% price increase over the FX-9590. Does the i7-4770K really perform 29% better than the FX-9590? The short answer is “no.” The long exception to that otherwise straightforward answer is “unless you spend all of your time calculating Julia mandelbrot sets and the digits of pi.”

Over two years ago, I wrote an article about how AMD CPUs beat Intel CPUs hands down when you factor in the price you pay compared to the performance you get. Most of the arguments I received against my assertion were against the single-figure synthetic benchmark (PassMark) I used to establish a value for CPU performance. This is understandable; synthetic benchmarks that boil down to “One Number To Rule Them All” don’t help you decide if a CPU is good for your specific computer workload. This time, I’ve sought out a more in-depth benchmark data set which can be seen here. I compiled some the relevant figures (excluding most of the gaming benchmarks) into a spreadsheet along with the Newegg retail price of each CPU as of 2014-10-23, used a dash of math to convert “lower is better” scores into an arbitrary “higher is better” value and some fixed multipliers per benchmark to make them all fit into one huge graph which can be downloaded here: cpu_performance_comparison.xls

And now, ladies and gentlemen, the moment you’ve been waiting for: a graph of a wide variety of CPU benchmarks, scaled by the price you pay for each CPU (click to expand the image.)

amd_fx-9590_vs_intel_core_i7CPUs in each bar series are ordered by retail price in ascending order. The FX-9590 is in yellow on the left of each series and Intel only has a CPU that beats the AMD offering in 4 out of 17 price-scaled benchmarks, most of which are synthetic and don’t represent any typical real-world workloads.

AMD wins again.

Update: In case you needed more proof that the FX-9590 is the best encoding chip, someone sent me a few links to more x264 benchmarks: 1 2 3

If Newegg says “item was received with apparent end-user caused physical damage to the CPU socket contact pins” here’s how to fix that problem

THREATEN TO CONTACT A LAWYER.

You should know that I am not a lawyer; however, I find that when a large company seems to not care, the possibility of getting a lawyer involved when you have been genuinely wronged by them gets you the attention needed to resolve the situation.

For a couple of years now, Newegg has been rejecting RMAs on motherboards with LGA-style CPU sockets and they always say that “item was received with apparent end-user caused physical damage to the CPU socket contact pins.” There are plenty of stories about this bad behavior all over the Internet. In fact, I have experienced this problem personally and written about it from the persepctive of boycotting the people who engineered the socket that allows for such easy breakage and is exploited by Newegg for RMA rejection.

If you receive a notice that your RMA was rejected for this reason, talk to customer service and tell them that you believe that their RMA technicians caused the damage to void the RMA. If they refuse to process the RMA, don’t waste time asking for a supervisor; instead, tell them that your lawyer will be very interested in this situation and ask them for the contact information for Newegg’s legal department. Also ask for the customer service agent’s name and their internal company identification number so they can be subpoenaed to testify if a lawsuit against Newegg is filed.

This communicates a few things that may magically get your RMA problems solved. One, it tells customer service that you are someone who will not let this issue go and will fight it in the legal arena if needed, a situation that no company wants (especially considering the widespread accounts of Newegg’s behavior). Two, it gives the company an added incentive to not screw you over and could cause a “good faith exception” to the policy be granted to you.

Another excellent outlet for getting your problems resolved is to email the VP of customer relations (or public relations)  or someone relevant under the “Investor Relations” section of the website. These people have a very strong interest in the company’s success. Don’t email the legal department. If you need to get your lawyer involved, your lawyer can do that.

If you buy a new motherboard and want to “cover your ass…”

  1. When the package arrives, DO NOT OPEN IT YET!
  2. Get something that takes decent quality video. Most phones will take excellent video if you don’t use an “MMS compatible” recording mode which records terrible quality video.
  3. Record a video of the entire unboxing process, from cutting the packing tape to removing the motherboard box to opening the board to inspecting the CPU socket closely for damage.
  4. That part is important: inspect the CPU socket for damage with the camera. If there is anything wrong, put it all back together on camera, seal the motherboard box with tape, and RMA it immediately.
  5. DO NOT UNDER ANY CIRCUMSTANCES attempt to use a board that appears to have socket pin damage. This could blow up your CPU and could cause your RMA to have other reasons to be rejected.

HP Deskjet 2540 series (2542, 2543) won’t print at all? Try this…

I helped a customer with a Windows XP computer who purchased a brand new HP Deskjet 2542 to get his printer (which says on the box that it supports XP!) to work. The first printer I had him take back due to it not printing any documents at all and the alignment page missing many lines of information. The second printer would print an alignment page but would not print ANY documents, not even a printer test page. Here’s what I initially tried to get it to work:

  1. Updating the printer firmware
  2. Changing the USB cable
  3. Changing from USB to wireless connectivity
  4. Changing the network connectivity from JetDirect RAW on port 9100 to IPP
  5. Updating the driver from the provided CD to the latest driver from HP
  6. Changing the print processor from “XPS_EP -> RAW” to “WinPrint -> RAW”
  7. Trying random HP printer drivers that come with Windows XP
  8. An uneventful exorcism

Nothing worked until I tried the HP PSC 950 driver. After installing the printer, I brought up its properties, then used the “New Driver” button on the Advanced tab to switch the printer driver. The HP management software works regardless of the actual printer driver selected and the HP PSC 950 driver prints consistently. It’s sad that HP’s own drivers don’t work but a random old HP printer driver that probably shouldn’t work does the job.

Using SaveTube and ffmpeg to download 480p, 720p, and 1080p from YouTube

I have used the excellent SaveTube script for Greasemonkey for quite some time. It lets you download video files from popular video sharing sites and it does a fantastic job. One of the flaws that has existed for quite some time is that SaveTube can only obtain working video/audio files for lower quality levels because of the MPEG DASH formatting done to make changing the resolution on-the-fly function properly.

It’s not SaveTube’s fault, however I have wanted to pull full-quality videos from YouTube for a long time, so I contacted SaveTube’s creater “isebaro” about it. He produced this test userscript which creates a right-clickable link for downloading the DASH streams, enabling me to pull the maximum quality video/audio streams and store them. Choose a very-high-quality stream, right-click, save link as, and rename “videoplayback.mp4” to something more relevant.mp4!

One problem remains: the video and audio streams are separate files. We’ll use the most awesome media splicing program on the planet, ffmpeg, to merge the streams. On Linux you can use your package manager to obtain ffmpeg; for Windows and the link provided, get the “static” version that matches your OS (32/64 bit) and extract the ffmpeg.exe binary, then copy it into the C:\Windows folder (so you can run it from anywhere). ffmpeg runs within a Command Prompt or a Linux terminal.

I already had a copy of the lower quality video with the audio stream, so I used that. Here’s what you type to do the audio/video merge:

ffmpeg -vn -i “Audio stream source.mp4” -an -i “Video stream source.mp4” -vcodec copy -acodec copy “Awesome 1080p Video.mp4”

The switches are as follows. -vn means “don’t use video from this file” and -an means “don’t use audio from this file.” -i indicates an input file and must come AFTER the options that directly apply to that input file. “-{a,v}codec copy” tells ffmpeg not to decompress and recompress the streams, but to do a direct copy of them without further processing (you DO NOT want to recompress streams, I promise!)

Once you’ve merged the streams and verified the new video file works properly (seek around to check for A/V sync issues), feel free to delete the original stream files.

[SOLVED] X terminal emulator doesn’t read .bashrc or .profile or /etc/profile, shows ‘sh’ prompt

This is an ancient problem, but I seem to run into it frequently and even briefly forget it. When you open an X terminal emulator such as Xterm or rxvt, you might be frustrated by the fact that you can’t get a profile or startup script to run in the shell prior to displaying a prompt. Your shell prompt also defaults to something fairly useless like “sh-4.3$” instead of something more informative and fancier.

This occurs because your user account’s default shell is either not explicitly set or is set as /bin/sh rather than /bin/bash. To fix this you’ll need to run the following command as root (i.e. with su or sudo):

usermod -s /bin/bash your_user_name

You’ll need to log out and back in before the change will fully take effect; alternatively, if you’re starting X from a command prompt, you can drop out of X, export SHELL=/bin/bash, and start X again. This can also be done in your .profile or .bashrc as a workaround if you don’t have root access for some reason and don’t use a graphical login manager.

The answer to “I spilled something on my laptop/notebook computer! WHAT DO I DO?”

I’ve dealt with liquid spills on laptops for many years now. I’m writing this because I just spilled a whole glass of milk on mine, in fact! Most people dry it off as fast as they can, but that’s just a good way to allow your laptop to get ruined by the liquid. This is my guide on what to do when you spill something on your laptop.

  1. TURN OFF THE COMPUTER IMMEDIATELY. Hold the power button for 5 seconds if necessary.
  2. If the spill was not directly on the laptop, pick up the computer and dry it off quickly. Inspect the bottom and sides for evidence of liquid seeping into any holes or ports. You may be lucky enough to have simply gotten some liquid on the feet or the edges. If in doubt, the machine should be taken apart by a computer shop and inspected.
  3. If the spill was on the keyboard/touchpad area, your first priority is to turn the laptop upside down in the air, without closing the unit. The most common damage from liquid spills is from when liquid is allowed to seep into the keyboard; while many laptop keyboards are a simple $30-$40 part and a fairly quick disassembly from being fixed, you don’t want to have to do this. The liquid will cause your keyboard mechanisms to stick and the pads under the key’s rubber “nipple” to corrode. The laptop should remain open so that the liquid leaking back out of your keyboard doesn’t destroy the (far more expensive to replace) LCD panel.
  4. Dry up all visible liquid as fast as you can without putting physical stress on the computer. Visible liquid can end up in bad places very quickly. Dry the laptop off as quickly as you possibly can. The last thing you need is to have more places to clean out the liquid.
  5. Remove the laptop’s battery (if possible) and the AC power supply. If the unit comes on with the liquid in a bad place, it may be damaged. You are not at risk of getting electrocuted, thought, so don’t worry about that!
  6. Use a can of compressed air or (better yet) an air compressor with a blower attachment at 90-110 PSI to blow ACROSS THE FLAT SURFACE of the laptop with a side-to-side movement of your arm across the length of the keyboard. Your goal is to indirectly blast the liquid that has become trapped under the keyboard keys out of the mechanisms and off of the keyboard without blasting the liquid into even worse places. By blowing across the surface of the computer, you’ll get a lot of liquid out. Dry all liquid as fast as possible.
  7. Anywhere that you see evidence of liquid having touched needs to be blown across as well. Your USB, VGA, HDMI, Ethernet, and other ports, as well as buttons and switches ALL need to be cleaned out. Inspect everything to make sure there is nothing you’ve missed.
  8. Get a clean adjustable spray bottle that can do a mist spray and put in water with the lowest mineral content you can get. Distilled water is ideal; drinking water is usually better than tap water since tap water often contains many chemicals and minerals. If tap water is all you have, use it; it’s better than what you’ll be cleaning out, after all.
  9. Using the spray bottle set to where it mists the water, lightly spray your keyboard with two firm sprays of mist. This does two things: one, it prevents the liquid you want to remove from completely drying up before you can get it out; and two, it dilutes the offending fluid and acts as a medium to get it out of there.
  10. Blow the keyboard area off again as you did before, drying the fluid off as it flies out. This should get most of the offending junk out of the keyboard. This time you will want to start blowing at an increasing angle until you’re blowing off every key directly from the top. This should spray out any liquid that is still inside the keyboard. Repeat the misting and blowing if the water is visibly colored, as this indicates there is still significant liquid residue in the system.
  11. Use your mist spray to lightly damp a paper towel and clean everything off: keyboard, touchpad, palmrests, LCD panel, lid, base, ports, whatever. BE THOROUGH. Remember to gently dry up any excess liquid (it should be thin enough that it dries up immediately, but you may have sprayed too much.) Any fluid on the LCD that air dries may leave an ugly thin mineral film on the screen where the droplets used to be. NEVER USE ABRASIVES, SOLVENTS, OR HOUSEHOLD CLEANING CHEMICALS ON LAPTOPS. Special LCD cleaner sprays exist for a reason. Using window cleaner, alcohol, dish detergent, or any other cleaning chemical will permanently damage your screen.
  12. If you are capable of disassembling your laptop without damaging it, take it apart and inspect it. The liquid is likely to have leaked somewhere you can’t see and this can result in a destroyed motherboard or other internal damage as the unseen liquid corrodes away at the electrical stuff inside.
  13. If you cannot disassemble your laptop, IMMEDIATELY call a computer service shop to have them disassemble it and inspect it inside. The longer you wait, the greater the damage will be. Most decent service shops will understand the urgency and take a look at it fairly quickly. Even if it costs you some money to have it inspected, it will still be far cheaper than replacing your laptop or having it repaired in the future because of the liquid damaging something important.

Remember that most drinkable liquids contain chemicals that will cause serious damage to your computer if not quickly cleaned out: soda, milk, wine, beer, coffee, juice, and even plain drinking water can mean trouble. Corn syrup, sugar, phosphoric acid, carbonation, sugars, minerals, tannins, and alcohol are just some of the things that can chew up circuit boards, corrode solder joints, and generally wreak havoc inside a laptop. Any spill is a race against time. Use your time wisely.

If you are unable to perform these steps for some reason, dry the unit as fast as you can, put a light towel or rag between the keyboard and screen to catch anything that leaks out, gently close the laptop and flip it upside down, and get it to a computer shop ASAP.  Make sure to transport it upside down at all times.

If the spill was over an hour ago, the laptop will have to be completely disassembled and it may already be too late. Again, take it to a computer repair shop as fast as possible.

[SOLVED] Netflix DRM errors with HTTPS Everywhere or NoScript installed

If you are using Firefox and certain security, HTTPS, or script blocking  extensions, you might not be able to use Netflix and get a “Digital Rights Management (DRM) error” such as N8156-6003, N8156-6013, N8156-6023. Many websites say that the solution to the problem is to delete the file “mspr.hds” located at %ProgramData%\Microsoft\PlayReady, but this does not always work because this isn’t always the underlying problem.

The problem is caused by scripts from microsoft.com required to use Silverlight DRM not loading properly. The fix is simple and does NOT require disabling NoScript or HTTPS Everywhere nor does it require restarting Firefox in Safe Mode just to watch Netflix. Make sure that you’re already allowing scripts to run from “netflix.com” and “nflxext.com” as these are also required for Netflix.

For NoScript, visit microsoft.com, open the NoScript menu, and choose “allow microsoft.com” from the list.

For HTTPS Everywhere, open the Add-ons Manager (usually under the Firefox menu, or under Tools -> Add-ons) and beside HTTPS Everywhere, click “options.” Type “microsoft” in the Search box. Look for “Microsoft (partial)” in the list and click the green check beside it to change it to a red “X” instead.

If you are running other script blocking software or extensions, you should be able to find a way to both unblock scripts from as well as don’t force HTTPS on the domains netflix.com, nflxext.com, and microsoft.com.