I’ve decided to document the process of making The Old Man’s Pendant III and this is the first installment. In this debut entry I discuss the challenges of the first two films and the thought process that defines the third one which I’m currently working on.
Tag: filmmaking
Protip: filmmakers, STOP “shooting flat” or using cinema color profiles on your camera
Update: I’ve written a much more comprehensive article on the subject of shooting with flat/log color profiles at the Gazing Cat Productions blog. This post is a good short example, but I show better examples and explain the problem in great depth at GCP. If you have the time and want to grow your knowledge about digital video, it’s definitely worth investing the time to read the 3000+ word post there instead of this one.
I plan to do a much deeper video on this subject later, but for now I’ve found a perfect example of the sort of “you should shoot flat [for that coveted film look of course]” bad advice I see online all the time. If your camera does not output files that have 10-bit (or higher) color channels, you should NEVER SHOOT FLAT, LOG, or CINEMA COLOR PROFILES, EVER. (Hint: if you don’t already know whether your camera produces 8-bit color or 10-bit color, it produces 8-bit color.) I’ll point you to this article “Should I Shoot Flat and Underexposed?” with a Technicolor CineStyle example image so you can read their advice and then I’ll show you with THEIR OWN IMAGE why shooting flat on your DSLR is a really bad idea, then I’ll explain what’s really going on.
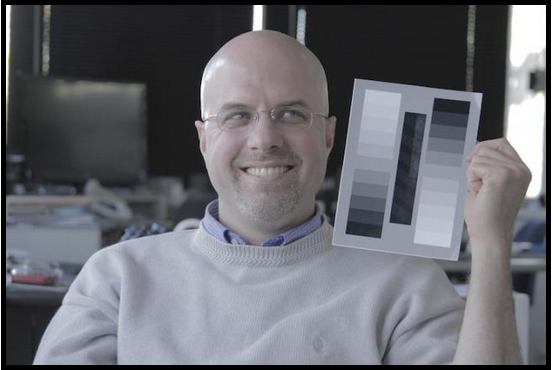
Here’s their original image which was shot with Technicolor CineStyle, a “flat” picture profile that supposedly helps you get more dynamic range and therefore better looking video:
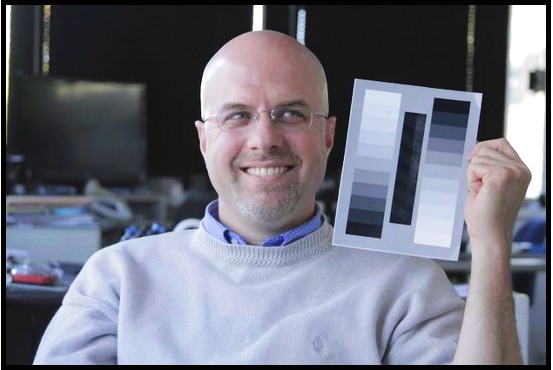
And here’s what it looks like after I pull it into an image editor, boosting contrast, saturation, brightness (a little) and gamma (a little) to make it look “normal” again:
Let’s take a closer look at the face side-by-side, before and after.

Keep in mind that this is a small JPEG image from their website, not a lossless shot of the original frame. There are JPEG artifacts visible in both images, but those artifacts help us get a better picture of why “shooting flat” on cameras without 10-bit color is a bad idea: notice how the JPEG artifacts in the corrected image are WAY more obvious and the quality loss after my simple color correction drastically lowers the apparent “production value” of the image? That’s a big part of the problem, but the other part is the colors. The reduced saturation requires heavy saturation boosting to look normal again but the damage caused by discarding a lot of the color DIFFERENCE information cannot be undone; the face has color banding issues that make it look more “plastic.” The flatter you shoot, the nastier this color banding gets. No amount of correction or magical LUT will ever make it look normal again.
When you shoot flat, the 1/2-stop of dynamic range you gain comes at the cost of effectively ruining your color and increasing blocky compression artifacts and noise. That’s why you can’t color grade properly. That’s why it looks like garbage when you push it in post. It’s not your fault; you were given advice intended for $10,000 cameras and you’re holding a $500-$1000 camera. This applies to any flat, LOG, or “cinema” picture style. Technicolor CineStyle, Panasonic Cinelike-D and V, V-LOG, Canon S-LOG, all of them will permanently damage your 8-bit footage and possibly make it useless. You can’t outsmart the basic math: 8 bits of space can’t hold more than 8 bits of data.

Use a standard picture color profile with all tweaks set to zero or their default values (turn noise reduction all the way down though, especially on Panasonic mirrorless cameras), take test shots, push the footage in your editor to see how far it goes before falling apart, tune your settings, and repeat until you get the best results possible straight out of your camera.
As I mentioned before, if you happen to have a camera that can output 10-bit color (to the files on your memory card, 10-bit HDMI without an external 10-bit or RAW-capable recorder doesn’t count) then you have 4x or more added color detail that will be lost in the 8-bit final product after editing anyway, but the only DSLR or camcorder I am aware of that is affordable to consumers and has 10-bit color is the Panasonic GH5. Even Canon’s expensive new 5D Mark IV DSLR only outputs 8-bit color! In the camcorder world, 10-bit color is available on the Panasonic DVX200 which is about 40% more expensive than a Canon 5D Mark IV.
If you want to read more, this excellent article does a great job of explaining further, including images that illustrate the problem of “breaking up the histogram” brought about by shooting “flat.” I will post a video about this eventually, so subscribe to my YouTube channel if this topic interests you.
One final note: picture profiles only apply to compressed video formats. If you’re shooting in a RAW video format like many very high-end cameras can produce, you’re getting 100% of the sensor information already, so picture profiles simply don’t apply in the first place and you don’t have to care about any of this stuff for that camera. Of course, if you’re shooting on a $50,000 camera rig, you probably aren’t reading this post, either…