Update: I’ve written a much more comprehensive article on the subject of shooting with flat/log color profiles at the Gazing Cat Productions blog. This post is a good short example, but I show better examples and explain the problem in great depth at GCP. If you have the time and want to grow your knowledge about digital video, it’s definitely worth investing the time to read the 3000+ word post there instead of this one.
I plan to do a much deeper video on this subject later, but for now I’ve found a perfect example of the sort of “you should shoot flat [for that coveted film look of course]” bad advice I see online all the time. If your camera does not output files that have 10-bit (or higher) color channels, you should NEVER SHOOT FLAT, LOG, or CINEMA COLOR PROFILES, EVER. (Hint: if you don’t already know whether your camera produces 8-bit color or 10-bit color, it produces 8-bit color.) I’ll point you to this article “Should I Shoot Flat and Underexposed?” with a Technicolor CineStyle example image so you can read their advice and then I’ll show you with THEIR OWN IMAGE why shooting flat on your DSLR is a really bad idea, then I’ll explain what’s really going on.
Here’s their original image which was shot with Technicolor CineStyle, a “flat” picture profile that supposedly helps you get more dynamic range and therefore better looking video:
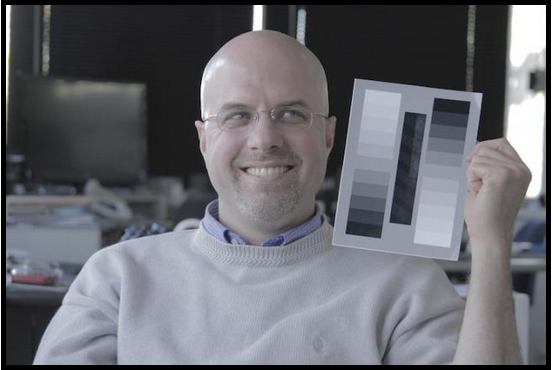
And here’s what it looks like after I pull it into an image editor, boosting contrast, saturation, brightness (a little) and gamma (a little) to make it look “normal” again:
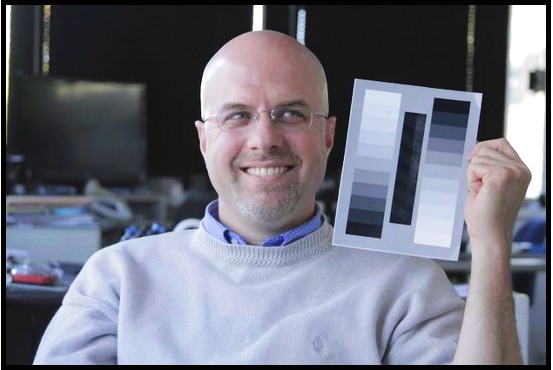
Let’s take a closer look at the face side-by-side, before and after.

Keep in mind that this is a small JPEG image from their website, not a lossless shot of the original frame. There are JPEG artifacts visible in both images, but those artifacts help us get a better picture of why “shooting flat” on cameras without 10-bit color is a bad idea: notice how the JPEG artifacts in the corrected image are WAY more obvious and the quality loss after my simple color correction drastically lowers the apparent “production value” of the image? That’s a big part of the problem, but the other part is the colors. The reduced saturation requires heavy saturation boosting to look normal again but the damage caused by discarding a lot of the color DIFFERENCE information cannot be undone; the face has color banding issues that make it look more “plastic.” The flatter you shoot, the nastier this color banding gets. No amount of correction or magical LUT will ever make it look normal again.
When you shoot flat, the 1/2-stop of dynamic range you gain comes at the cost of effectively ruining your color and increasing blocky compression artifacts and noise. That’s why you can’t color grade properly. That’s why it looks like garbage when you push it in post. It’s not your fault; you were given advice intended for $10,000 cameras and you’re holding a $500-$1000 camera. This applies to any flat, LOG, or “cinema” picture style. Technicolor CineStyle, Panasonic Cinelike-D and V, V-LOG, Canon S-LOG, all of them will permanently damage your 8-bit footage and possibly make it useless. You can’t outsmart the basic math: 8 bits of space can’t hold more than 8 bits of data.

Use a standard picture color profile with all tweaks set to zero or their default values (turn noise reduction all the way down though, especially on Panasonic mirrorless cameras), take test shots, push the footage in your editor to see how far it goes before falling apart, tune your settings, and repeat until you get the best results possible straight out of your camera.
As I mentioned before, if you happen to have a camera that can output 10-bit color (to the files on your memory card, 10-bit HDMI without an external 10-bit or RAW-capable recorder doesn’t count) then you have 4x or more added color detail that will be lost in the 8-bit final product after editing anyway, but the only DSLR or camcorder I am aware of that is affordable to consumers and has 10-bit color is the Panasonic GH5. Even Canon’s expensive new 5D Mark IV DSLR only outputs 8-bit color! In the camcorder world, 10-bit color is available on the Panasonic DVX200 which is about 40% more expensive than a Canon 5D Mark IV.
If you want to read more, this excellent article does a great job of explaining further, including images that illustrate the problem of “breaking up the histogram” brought about by shooting “flat.” I will post a video about this eventually, so subscribe to my YouTube channel if this topic interests you.
One final note: picture profiles only apply to compressed video formats. If you’re shooting in a RAW video format like many very high-end cameras can produce, you’re getting 100% of the sensor information already, so picture profiles simply don’t apply in the first place and you don’t have to care about any of this stuff for that camera. Of course, if you’re shooting on a $50,000 camera rig, you probably aren’t reading this post, either…
Thank you, this is very helpful.
This is great! I was confused with the hype around canon dslr “logs”.
You do know that this “pro-tip” is going against the advice of Philip Bloom and Shane Hurlbut? Are you sure that you’re more “pro” than they are and that you’ve really understood the issues?
https://philipbloom.net/blog/pictureprofiles/
Appeal to authority is a logical fallacy for a good reason. I don’t care what Philip Bloom thinks. I care if what he advocates produces good results.
On any device that produces 8-bit depth output files, simple math says I am absolutely correct. If you squeeze a 32-level section of the brightness range into a 24-level section (no fractions) and then expand it back to 32 levels, you don’t get the original 32 levels back. There are extremely limited circumstances where log footage can achieve better results on 8-bit cameras, but that’s effectively limited to scenes of extremely high contrast where quality is less important than avoiding clipping.
If you have 10-bit output files, you have a lot more detail than the final 8-bit output, so using tricks like log can work in more situations. Shooting “flat” (cranking down contrast and saturation and whatnot) is always a mistake.
Hi, I’m wondering if it’s a good idea to bake in a color grade via picture profiles. I’m assuming DSLRs with 8 bit video apply the picture profile before the compression (hopefully), so in theory, would I be able to pre-color grade my footage and reduce the work in post production?
If picture profiles are taken into account before the raw readout is compressed, would that mean it might be possible to create cinematic LUT-like filters and apply it to to get good colours/dynamic range without worrying about 8 bit issues like banding etc.? Obviously it results in loss of flexibility in post, but I’m just curious.
It’s a neat idea, but I would advise against it in general. The problem is that you’ll be permanently applying that grade to the footage. If you change your mind at any point, you’ll be stretching the values out more than if you had just shot with standard/neutral color and graded from there. I don’t know if picture profiles are applied to the raw data before 8-bit quantization or not, though I imagine it is, but the “distance” between graded footage and differently graded footage can be significantly bigger than the “distance” between neutral footage and either grade.
Keep in mind that “cinematic look” is largely a function of lighting, costumes, sets, locations, and camera handling. The film Tangerine was shot entirely on one iPhone. iPhones (in my opinion) are very inferior compared to even just a 10-year-old premium compact point-and-shoot like the Panasonic LX7. Despite this, they managed to create a “cinematic” film, because it’s all in the presentation, not the technical superiority. LUTs and picture profiles and 8-bit/10-bit are not the right path to go down until the stuff that’ll be in front of the camera is right. Get it right in-camera as much as possible without getting crazy, then worry about grading in post.
Also, if you publish to YouTube or Netflix or any other online streaming platform, the video will have crappy compression artifacts anyway, no matter how pretty your 1080p master ends up looking. They don’t care. They compress to save bandwidth. You could tell them to set the x264 quantizer mode to AutoVAQ (Biased) [3] but they won’t listen.
I’ve always wanted to make movies (short films, anyway) and only recently could afford to buy the 5-year-old Panasonic G7. I can’t say I have the resources to handle 4K or can competently grade even 1080p. Please, how do I get the best possible color straight out of the camera?
As far as the picture profile goes: Standard profile, leave everything in it set to 0 except noise reduction which should be at -5. You don’t need to be competent at color grading; what you need to learn is to lock the white balance properly. DO NOT USE AUTOMATIC WHITE BALANCE. ALWAYS LOCK THE WHITE BALANCE. You can’t grade a constantly changing white balance without horror (I’ve done it). If you shoot with the wrong white balance, it’s easy to pull the footage into an editor and use something to change the color balance of the footage. Premiere Pro has the Lumetri Color effect which has tons of options, but just sliding the Temperature and Tint (blue/red vs. green/magenta) numbers will allow you to easily fix your white balance later. If color is not strong enough, you can boost Saturation. If color is too strong and you want a more muted look, lower Saturation. Color grading is an art and a science at a high level, but on a fundamental level, “color grading” is really just about selecting a look that feels right to you for the mood of the scene.
Always remember that everything outside of the camera is more important than the camera itself. Sets, costumes, lighting, actors, good writing, decent camera operator. If you want to be that camera operator, practice shooting in fully manual mode with ISO, aperture (iris), and shutter (exposure time) locked. Practice manual focus and focus pulling. If you have an electronic focus lens (the ring isn’t mechanically linked to the focus inside the lens, which is the case if you spin the ring and it never stops) then you can’t do focus pulls and need to practice using the touchscreen and autofocus to change focus points in real time (called “focus racking”) and accept that some bad shots might happen due to the focus racking going wrong (repeat until it’s right, or don’t focus rack).
I shot my first film on a Canon R60 consumer camcorder. It only has very crude “idiot level” manual controls and it has an absurdly small sensor. It is a capable camcorder but doesn’t produce any image that is remotely as nice as the G7 does. The camera isn’t important. I made several works with that camcorder before buying something bigger. Don’t worry about the camera; worry about getting good results.1
Thanks a lot, Jody. And thanks again. You just taught me all of filmmaking in this one reply.
Just because it’s on his blog doesn’t mean he uses it. The article written by Preston Kanak. Philip Bloom himself on his twitter stated that he doesn’t use cinestyle. Don’t put words into people’s mouth.
https://twitter.com/philipbloom/status/246540100387872768
You didn’t reply to a specific comment. Which comment were you replying to? The one by “jay francis” or my response to that?
My apologies for the late response. My comment was replying to “jay francis”.
I fell into the cinestyle hole when I was younger and I had such a hard time dealing with skin tones. On top of that I’m also deutan colorblind, but that never stopped me. I enjoyed reading your article and watching your video about flat and “log” like picture styles for canon. It’s a real eye opener.
– Keep in mind that “cinematic look” is largely a function of lighting, costumes, sets, locations, and camera handling. – Bazinga.
I just found back my way into photography & videography. Being away for almost 30 years I’m amazed what is going on these days. The exaggeration of gear, narratives like Bokeh. It’s mind boggling.
Yeah, it’s pretty bad. There are situations where bokeh and shallow DOF are nice, but the truth is that the vast majority of amateur photos taken with a large-sensor camera suffer from a LACK of focus depth rather than an excess of it. There’s a video on YouTube where a pro photographer shoots a studio portrait of a model and stops down for each subsequent shot to see if wide apertures in portraiture is really all it’s cracked up to be. The short version is that it isn’t: the f/8 shot looked better than all of the wider aperture shots because her side and rear head hair was much more in focus along with her face. The only benefit of huge apertures and sensors is the ability to capture in low light; I have been in very low-light shooting situations like a dance hall, where not having a huge aperture lens crippled me, but most shooters DO NOT have that problem. Most lenses are sharper when stopped down, too, so I generally regard the bokeh/shallow DOF thing as something that shouldn’t be glorified at all. As for gear, don’t get me started…my favorite point-and-shoot cost me $75 on eBay two years ago and I have captured more wonderful photos with that thing than I ever did with my overpriced Canon Rebels.
I am very pleased I found this article because frankly I thought I was going mad! My background of over 35 years is as a stills photographer, mainly studio based and mainly food. My biggest, and now only client due to Covid, has talked about video several times in the past and I have supplied them with two videos which in my opinion were just about adequate. The reason for my disappointment with both was colour grading after I had used the Cinestyle profile. I could never get the footage to have the same contrast and saturation as my stills work and when I tried it looked harsh and crude. I have spent hours looking at Youtube videos telling me how to do this or that but my footage out of my 5D mk3 never looked any good even after spending hours in DaVinci Resolve(I did use Premiere but my licence has run out and I’m skint!). There are many things I would like to ask because I feel like I am a fraud saying I can do video when I can’t get the basics of grading right, this article has restored at least a bit of my confidence.
Maybe shot in log and apply only a bit of saturation and contrast could be a way to go. The normal colors in my cameras are way off, my smartphone and my Sony RX100 mk1 gives a pop fluor reds. So I go to -3 saturation, -3 contrast and -3 sharpness and the video looks better because I can get rid the crazy reds. Sometimes I keep the sharpness and contrast at -3 and the saturation to -2 if I want to keep the video straight out of the camera.
What picture profile are you using on the RX100? A lot of times, you can use whatever “natural” or “neutral” profile is provided and get more even color reproduction. Canon likes to make reds pop too much as well, which is one of many reasons I recently dumped my entire Canon T6i/750D setup I had slowly built up over 11 years. No camera is perfect, but Canon’s reds were kind of ruining my video workflow.
Hello Jody,
I’ve read your article, both ones! here and on the link at the beginning of your article. First let me highlight that i’m a total novice. And even though i got the message ” don’t shoot flat with an 8bit output”, i’ve been wondering. how do you do it with a panasonic DMC G7.
I’ve read in your comment section, use standard profile with NR to -5. But do i shoot underexposed too with that setting? How do you we achieve a “filmic” look with the G7? I sound like a novice with the “filmic” look cheesy statement but i’m really a novice. I know my limitation and accept it, that is why i’m asking for advice. I really hope you get to answer my dumb question
I had a very nice comment typed for you and lost it. The short version is: reduce contrast and saturation in your picture profile. Remember that you’re going to have ugly midtone colors though, and it’s only useful at all for very high-contrast scenes (think: a beach sunset, a street light at night) so you’re going to want to shoot a lot of test footage and BE SURE TO EDIT THAT FOOTAGE BEFORE TRUSTING THOSE SETTINGS! Don’t make the mistake of shooting flat on anything important without being absolutely certain that you gain something from doing so. I have a G7 as well, but it doesn’t matter, because the problems with flat shooting carry over to any camera you’d buy. I have a GH5s now as well, and the 10-bit 4:2:2 output somewhat blunts the need for flat shooting due to having four times the channel (luma and 2 color/chroma channels, aka YUV) depth plus double the color resolution. If you shoot a 10-bit shot properly exposed to the right (ETTR), you’ll be able to pull up the shadows in your editor by as much as 200% before you hit the mathematical limit of the footage and start introducing banding. Of course, on a G7, it’s 4:2:0 and 8-bit in all modes, so that’s not an option.
By the way, if you get a lot more serious about filmmaking and want the peak MFT video camera at a decent price, watch KEH Camera for used GH5s bodies. I picked mine up for about $1300 in “excellent plus” condition; when the model was brand new, it was a $2500 body, and new retail at the time was on big discount but still cost $1800. The GH5 isn’t as good for video in some respects, but more recent firmware updates give it 5K and even some 6K recording abilities, even though it was originally only a 4K-capable body. Personally, I’ll take the GH5s benefits over the GH5. I would, however, also encourage you to stick with that G7 for as long as you can. Paired with decent lenses (that can be used on those bigger cameras later, so no reinvestment to upgrade!) you’ll find that the G7 produces fantastic 4K video for its age and price point, especially with NR -5.
I’m so glad I came across this..I’m just a noob starting out with making youtube videos for my cooking and art stuff but before learning to shoot, I watched quite a few beginner-friendly tutorials on shooting film that recommended the Cinestyle setting. I thought it was important and I pretty much abided by all the recommendations.
But after putting all the film I shot into Premiere Pro with Cinestyle, it was noticeably noisy in all gray and dark shadows. The scenes were brightly lit and with low ISO and I couldn’t see any issues on the display screen. But on my monitor, it just looked dirty and was very obviously noisy. Lots of banding after exporting even with high renders.
Compared to my test shots with Canon M50’s portrait, there were no problems there. I can’t understand a lot of technical camera stuff but this confirms that I wasn’t going mad. I hope I can improve my skills with using the camera though. Thanks for the info.
I’m glad that I helped you steer clear of a real pain in the neck. You can never go wrong with “make it look as correct as possible in-camera.”
Thanks for this informative article. I use a Sony a6500 mirrorless camera and have been in the process of deciding on which type of picture profile to use and what settings. Using S-Log2 or 3 would be unwise in this 8 bit camera with all the reasons you’ve mentioned above, so after more research I came across this profound “hack” called EOSHD. This videographer named Andrew Reid seems to have spent a long time configuring his settings and came up with a way to shoot directly off the card and not worry about much of any color grading or correction in post. What are your thoughts on this? https://www.eoshd.com/eoshd-pro-color-5/ (Note, I am in no way sponsoring/promoting anything from him)
I’ve seen a lot of tutorials about “use a flat profile for cinematic results” and I realized it was bull shit, I saw how the end result of their video was and I didn’t feel much of a change.
I also asked someone who used a sony a6400 which has slogs 2 and 3, but he suggested not using it at all because the camera only gives 8 bit footage, just like you said.
So… does that mean I have to adjust everything (both camera and on-location lighting) until it’s close to how I want it to look before press record button on my 8 bit camera?
In general, you should ALWAYS set up everything to look as close to the desired final result as possible. If you were using advanced trickery like log profiles with 10-bit footage, you’d still need to set everything up like that, THEN do any specific tweaks that are needed for that workflow. Always do your absolute best to get it right in-camera. The truth is that 90% of the “cinematic look” comes down to composition, lighting, costumes, and sets–not the camera itself.
Consider that the Panasonic DVX100 has been successfully used to shoot films, yet it’s a 4:3 ratio small-sensor camcorder with a technically inferior color subsampling method (4:1:1 which is worse than the 4:2:0 seen in nearly all cameras today). It can’t do crazy blurry backgrounds easily and the field of view is a bit narrow even at the the widest zoom, yet it’s possible to successfully shoot a true “cinematic” movie on it. While the camera is the tool used to capture the image, the image itself is composed of literally everything else, not the camera.