Tag: howto

FIX for Asus Vivobook X202E, Q200E, or S200E laptop CPU overheating and thermal throttling

UPDATE (2014-09-22): I finally hit thermal throttling on the Vivobook for the first time since I applied the thermal fix. The combination of working on a varnished pine wood table (original fix testing was on composite vinyl tiles), syncing two AES encrypted USB 3.0 drives, and compiling a Linux kernel all at once caused the processor to hit 88 degrees C and throttle briefly a few times. Performance was not noticeably affected. The fix is working well, but the soft wood and sustained full load for over half an hour seem to have explored its limits.

I recently had the chance to work with an Asus Vivobook X202E ultrabook (the S200E and Q200E are very similar models with only slight feature differences). I’d like to state upfront that these tiny laptops seem like pretty awesome machines. They can be had for less than $500, are quite thin and fairly light, constructed with plenty of metal instead of cheap easy-to-damage plastic, and pack a pretty scary amount of power under the hood. The Core i3-3217U CPU it uses is faster than most Athlon II X3 desktop processors, yet is designed for low-power applications where a standard laptop CPU can’t go. If this was a review, I’d go into more detail, but for now I would like to talk about one single aspect of these laptops.

The Asus Vivobook CPU constantly overheats and goes into thermal throttling at full load.

20140117_134300_scaled
Tritech Service System burn-in temperature display

What is thermal throttling? When a modern CPU reaches a certain temperature near the maximum operating temperature it’s designed to handle, the CPU will slow down the clock that keeps everything inside working at the same speed. For example, a 1200 MHz chip might throw its clock down to 400 MHz, reducing the heat it produces to a little over 1/3 what it was at 1200 MHz. This is both good and bad; the CPU is keeping itself from crashing by overheating, but performance drops severely until the temperature drops low enough. When it happens, you usually notice “stuttering” in the video or sound due to the sudden drop in performance, and nothing is more annoying than watching a TV show that jerks and has choppy audio for no apparent reason.

For many owners of the Vivobook 200 series, this doesn’t matter. It’s rare that streaming Netflix or watching a 720p video on YouTube (the LCD is effectively a 720p screen) will spike both cores–or all four threads if you prefer–to their maximum load. Even if it did trigger thermal throttling, the Vivobook doesn’t do it unless the 100% CPU usage is sustained for a minute or more based on my experiments, and most tasks that spike the CPU don’t do it for more than a few seconds.

Unfortunately, this thermal throttling also means that the Vivobook 200 series can’t run the CPU at full blast without random performance losses. I’d like to share with you how I fixed an Asus Vivobook’s overheating/thermal throttling problem completely.

Disclaimer: This is done entirely at your own risk, but you know that already, don’t you?
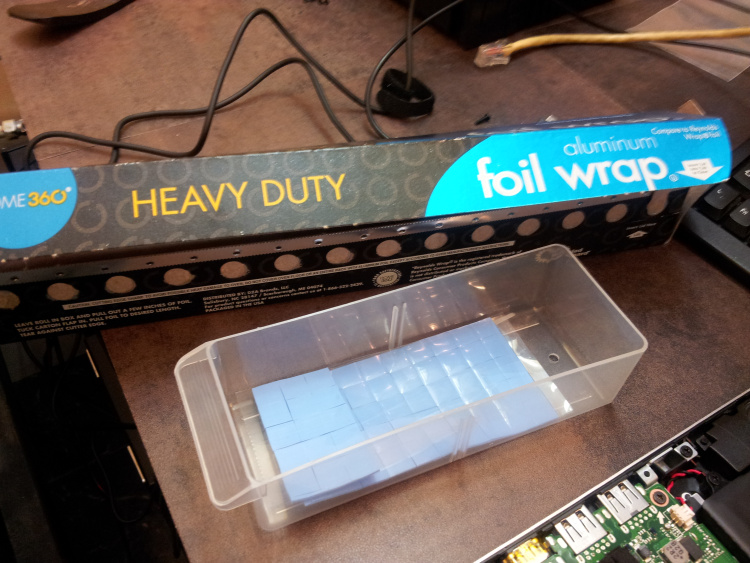
You will need:

  • Heavy duty aluminum foil
  • Lots of little thermal pads OR a cut-to-fit thermal pad sheet

20140117_123133_scaled

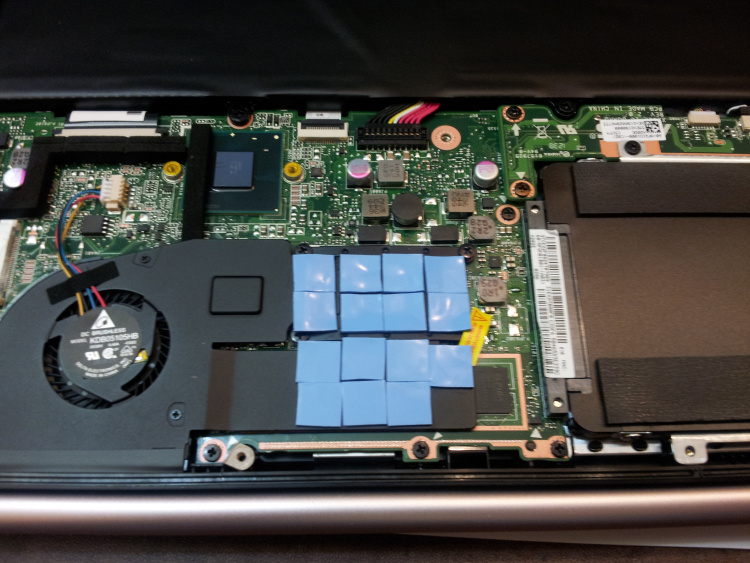
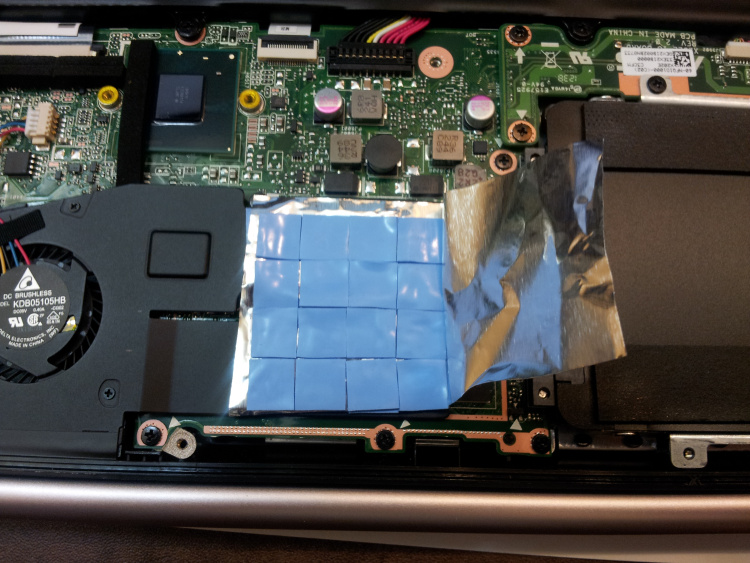
Remove the entire bottom from the laptop. With the motherboard facing up and the back facing you, look for the black square with the yellow warranty label stuck to the right-hand side.

20140117_123115_scaled

This square is what you need to cool off. Note that you will only be working with the square area to the right of where it “ramps” away to a small square indentation and the cooling fan assembly.

Cover the square (including the part that covers the RAM and also some of the “ramping” part) with thermal pads or a cut-to-fit thermal sheet.

20140117_123655_scaled

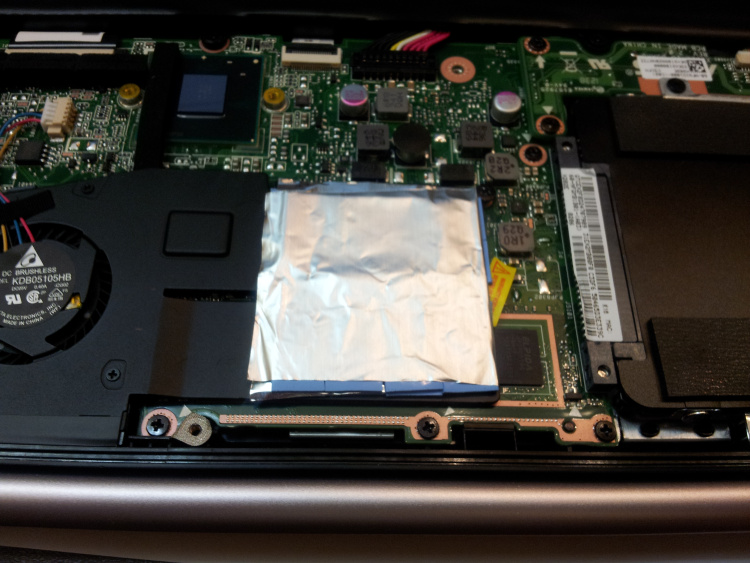
Cut (and remove any pointy bits remaining after cutting) a sheet of heavy duty aluminum foil that is exactly the size of the area you covered with thermal padding doubled horizontally so it can be folded over itself.

20140117_123911_scaled

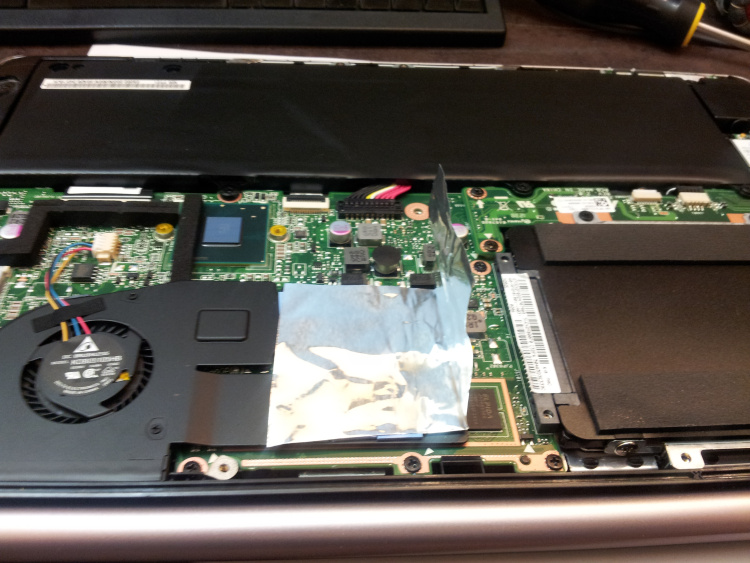
Lay half of the foil sheet over the thermal pads. Apply the exact same pattern of thermal padding on top of the existing padding and foil.

20140117_124425_scaled

Fold the foil over into a “sandwich” over those pads.

20140117_124507_scaled

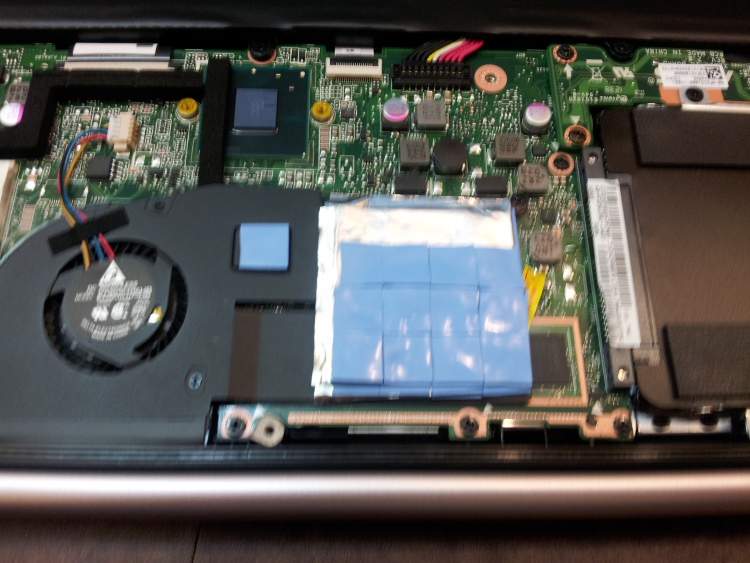
Apply one last layer of thermal pads except where the vents on the bottom will be. This will be the top 1/3 of the square you’re trying to cool; you can look through the vents at the thermal pads you’ve placed to see if you need to remove or relocate them.

20140117_125658_scaled20140117_125744_scaled

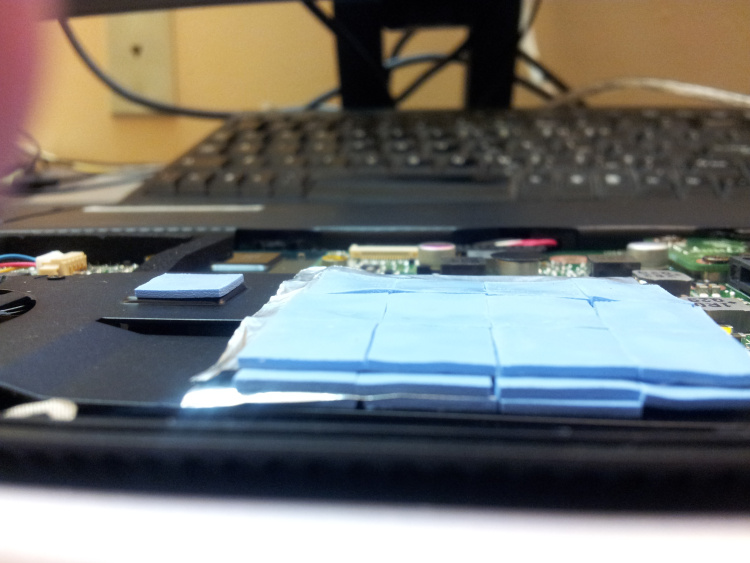
When the unit is closed, these pads will make contact with a foil layer that is part of the bottom panel. Close the unit carefully, checking the “give” of the back panel against where the CPU sits! I cannot stress this enough, because thermal padding often varies in thickness and you might have to remove a layer of padding and foil to safely reassemble everything. If you have doubts, take the computer to a professional that knows what they’re doing!

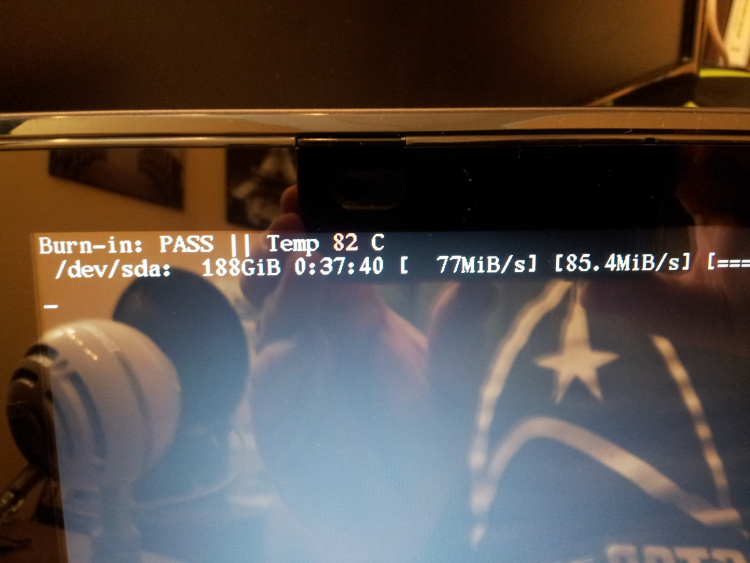
After doing this modification, a burn-in test on the Vivobook maxed out at 85 degrees C with no thermal throttling, where previously it would float at 89-91 degrees C and repeatedly throttle itself.

20140117_150959_scaled
CPU temperature in TSS with Vivobook sitting idle

The only minor disadvantage is that the Vivobook’s bottom gets warmer in the back because the CPU is now making thermal contact with it, but this shouldn’t be a problem and the improvement in performance under load and overall reliability should be worth it.

Please leave any questions in the comments and I will try to answer them quickly.

Sort compressed tar archives to make them smaller… 20% smaller!

How would you like for your file archives to be 20% smaller, with just the tools every Linux distribution already provides and a little ingenuity?  Read on and see how I did it!

There was a folder “NESRen” that I wanted to pack up for archival, and I knew it contained many files that share the same data, minus a few changes here and there.  When packing them up and compressing them into a tarball archive, I knew that I will achieve better compression if these largely similar files are put side-by-side in the archive so that the repeated blocks of data “compress themselves away” and take up almost no space.  Unfortunately, the GNU “tar” command in nearly every Linux distribution packs up files and folders in the order that the underlying filesystem chooses, which is almost always unordered and not optimal for compression.

How do we make tar put files in an order which will compress better?  The answer is to use the tar -T option, which lets you feed tar a list of files to pack up.  The list is processed line-by-line, and each file is packed up in the order provided.  You can, for example, create a list of files with the “find” command, then hand-edit that list to be optimal, and pass the list to tar (you must use the –no-recursion option when creating the archive from this list since the “find” makes a recursive list already):

find folder_of_files/ > list.txt
vi list.txt
tar -c --no-recursion -T list.txt | xz > archive.tar.xz

In my case, however, the folder structure and naming conventions allowed for creative use of the “sort” command to arrange the files. Since there is one folder “NESRen” followed by a series of categorizations, followed by the file names themselves (i.e. “NESRen/World/Pinball (JU).nes”) I can do something like this to make all files with the same name sort beside each other, regardless of the name of the category directory (as “sort” with no options would do):

find NESRen | sort -t / --key=3 | \
  tar -cv -T - --no-recursion | xz -e > NESRen.tar.xz

The “-t /” tells sort to use a slash as a field delimiter, and –key=3 tells it to sort by the third field (NESRen is field 1, the folder is 2, the file is 3).  What kind of difference did that make for the size of my .tar.xz archive?  Take a look (-nosort archive created with “tar -c NESRen | xz -e > NESren-nosort.tar.xz”):

Size of each file in bytes:

212958664 NESRen-nosort.tar.xz
170021312 NESRen.tar.xz

Size of the original folder and each file in megabytes:

705M    NESRen
204M    NESRen-nosort.tar.xz
163M    NESRen.tar.xz

By sorting the files, I saw a 20.1% drop in archive size using the exact same compression method, with a total compression ratio of 23.1% versus the unsorted 28.9%.  That’s a huge difference!  If this were 70.5GB instead of 705MB and the data exhibited identical performance, the final archive would be 4.1GB smaller–nearly the entire capacity of a single-layer DVD-R in space savings, just by sorting the file names before compression.

Applying a similar sort-then-compress process to the packing of the “ext” version of the Tritech Service System, a 700KB reduction in the total size of the archive containing “ext” was seen.  Of course, this doesn’t help as much because the archive itself was already 32.7MB in size (700KB is only a 2.1% reduction) but it still means shorter load and boot times due to less overall data to handle.

Next time you’re packing a lot of stuff up, see if you can use these tricks to improve your compression ratio.

Blocking access to MySpace without buying special software

IF THIS POST HELPS YOU, PLEASE LEAVE A COMMENT!

Usually, I have to advise people to purchase special software to block certain classes of content on the Internet, but here’s a quick tip to make your kids really, really angry by blocking a pesky social networking time-wasting annoyance of a website.  This trick works on Windows 2000 and XP and blocks all installed browsers; I’m not really sure about Vista.

  1. Go to [Start] and click on “Run…”
  2. Copy and paste in the following text (without the quotes):  “notepad %systemroot%\system32\drivers\etc\hosts”
  3. Add the lines below to the end of this file, save the file, and close Notepad.  Laugh at your kids, then lock them into a “Limited” account to keep them from undoing the changes.

— Copy the text below this line —

0.0.0.0 myspace.com
0.0.0.0 www.myspace.com
0.0.0.0 images.myspace.com
0.0.0.0 browseusers.myspace.com
0.0.0.0 search.myspace.com
0.0.0.0 forums.myspace.com
0.0.0.0 music.myspace.com
0.0.0.0 vids.myspace.com
0.0.0.0 classifieds.myspace.com
0.0.0.0 events.myspace.com
0.0.0.0 forums.myspace.com
0.0.0.0 blog.myspace.com
0.0.0.0 collect.myspace.com
0.0.0.0 ksolo.myspace.com
0.0.0.0 games.myspace.com
0.0.0.0 signup.myspace.com
0.0.0.0 latino.myspace.com
0.0.0.0 about.myspace.com
0.0.0.0 faq.myspace.com
0.0.0.0 signups.myspace.com

— Copy the text above this line —

To undo this, simply open the file again and delete these lines from the bottom, save, and close.